
Here's a simple procedure for giving a photo an aged, sepia appearance, like my shot of Eastbourne pier.
These instructions are for Paintshop Pro 7, but you should be able to achieve the same sort of results with most other popular photo editing packages.
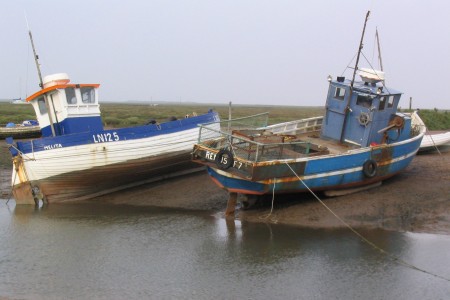
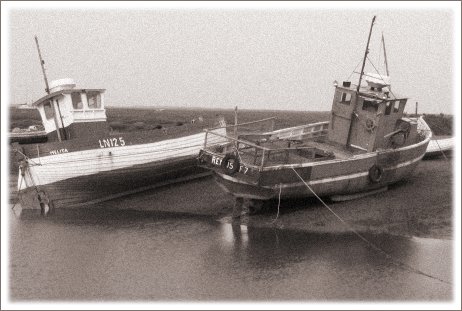
I'm going to start with this photo of two fishing boats:
The first step is to make the photo grainy by adding some noise.
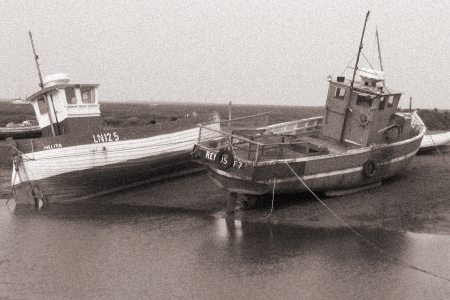
Select Effects->Noise->Add from the menus. You can experiment with the settings in the Add Noise dialog box, using the preview to see whether the effect is to your liking. For this picture I chose an amount of 12% and a noise type of "uniform". Here's the result:

Now we're going to give the photo a sepia effect. Choose Colours->Colourize from the menus. Again you can experiment with the settings, but I used a hue value of 12 and a saturation of 22 to produce this:
Not bad - almost there! But to really set it off we need to add a soft-edged border. We'll do that using a mask.
Select Masks->New->Hide All. Oh no! Our photo has disappeared! Actually it hasn't; it's now hidden behind the mask.
Choose Masks->View Mask. You'll see that the whole image now turns red. The red colour indicates which parts of the image are covered by the mask - currently the whole picture.
Choose Masks->Edit Mask. You'll see that the caption of the image window now has "(*MASK*)" on the end of it, and the palette has changed from a colour palette to a greyscale one. You're now in mask edit mode.
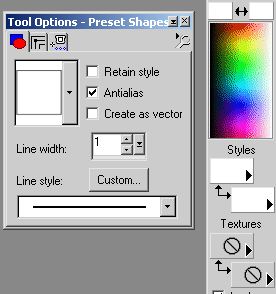
If you haven't used masks before, why not take this opportunity to experiment with the mask a little. Try painting on the mask in various colours. You'll find that as you paint white, you're removing the mask, and the image below begins to show through. When you paint in black, the mask is restored and the image is masked off again. Painting in shades of grey results in a semi-transparent mask.For this photo we just want to mask off the very edges to produce the border. So we'll remove the central portion of the mask. To do this, select the Preset Shapes tool. In the tool options, select the rectangle as the shape type, set the line width to 1 and make sure "Create as vector" is not ticked. Set your foreground and background colours both to white, and make sure the styles for foreground and background are both set to solid. Your tool options and colour palette should look something like this:
Draw a rectangle covering most of the image. This should leave the mask covering just the edges of the image, like this:
 Almost there! Now we have the makings of a border, but it has hard
edges whereas we want soft edges. To produce this effect,
choose Effects->Blur->Gaussian Blur. We're still in mask edit mode
remember, so we're applying the blur to the mask, not to the image itself.
I used a radius setting of 2 for the Gaussian blur. After applying the
blur, choose Layers->Merge->Merge All (Flatten). This will apply the
mask to the image, resulting in the edges of the image being masked off
allowing the default background colour of white to show through:
Almost there! Now we have the makings of a border, but it has hard
edges whereas we want soft edges. To produce this effect,
choose Effects->Blur->Gaussian Blur. We're still in mask edit mode
remember, so we're applying the blur to the mask, not to the image itself.
I used a radius setting of 2 for the Gaussian blur. After applying the
blur, choose Layers->Merge->Merge All (Flatten). This will apply the
mask to the image, resulting in the edges of the image being masked off
allowing the default background colour of white to show through:
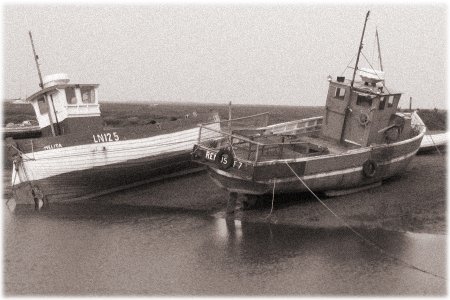 As a finishing touch, I used Image->Add Borders to increase the
width of the white border. Then I selected a darker background colour
and used Image->Add Borders again to add a 1-pixel dark border around
that. Here's the finished photo:
As a finishing touch, I used Image->Add Borders to increase the
width of the white border. Then I selected a darker background colour
and used Image->Add Borders again to add a 1-pixel dark border around
that. Here's the finished photo:
Looks like a scene from a bygone age, doesn't it? Well, maybe if you ignore the radio masts and radar domes anyway.